Alice in Wonderland themed card
Hey Crafty Friends,
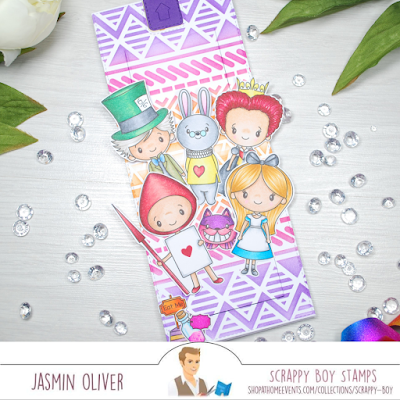
I'm so excited to share todays card using 2 brand new sets from Scrappy Boy Stamps, it's such an honour to be able to to work with these images and I had lots of fun with this one! You can see the full Wonderland collection including co ordinating dies here.
Alice in wonderland is a big thing where I live, being the town some of the story was written in we have lots of memorabilia around so I certainly have inspiration on hand however today's card I'm going completely whimsical and a bit of an Alice in Wonderland explosion!
I started with my images stamped on alcohol marker friendly card stock and coloured in Copics, I'm just going to take a moment to share the coloured images only and the colour combos used as I had real fun colouring these and most is likely to be covered up later!

Colour Combos:
Alice: B05, B03, B00, Y24, YR24 and YR23 and YR20
Queen: R59, R37, R32, C7, C5, C3, C1, Y08, Y06 and Y04
Mad Hatter: G17, G16, G14, Y28, Y26, W5, W3, W1, B05, B03 and B00
Card Man: R59, R37 and R32
Cheshire Cat: RV19, RV14, RV11, V17, V15 and V12
Rabbit: C5, C3, C1, Y08, Y06, Y04, R17, R14, R11, RV02 and RV00
Tea Pot: Y08, Y06, Y04, C7, C5 and C3
All skin tones were done in: E35, E11 and E00
Next I knew I wanted to incorporate the chess board, who doesn't think of this scene when they think of Alice in Wonderland! To create this I die cut what is usually the pull element on this interactive die from alcohol marker card and used a ruler to draw squares at 1cm increments and coloured them alternately using C9, C7, C5 and C3.

I've put this panel to the side for a moment and now cut my main front section of the interactive element from bright white card, I'm using a fun fiesta time stencil to give my card a funky edge. I used Distress Inks that matched the colours or as close to my coloured images. As my card is slimline and the stencil is 6x6 I stencilled down half way and then flipped the stencil and did the same pattern in reverse. Use the central crease of the card front to guide you half way down!

Picked Raspberry, Wilted Violet and Carved Pumpkin.
Next up I need another of the inside pull tab, cutting this from bright white card I decided to add a forest type theme using a stencil, starting with scattered straw I gave the card stock a light base colour and stencilled over the top with the birch forest stencil using frayed burlap. I've only gone about half way down from the top as this is all that will be shown when in action.

Now its time to start assembling it together, firstly take a card base 8.5" x 7" scored at 3.5" and lay your front panel on top, take your chessboard and work out where you might want to chop it down. I'm using my board to also create a lip for the front of my card to sit on when pulled up. You need about half of it, I've cut mine just above where I stopped colouring in my above picture (8 lines of squares). Using double sided sticky tape place this centrally at the bottom of your card base under the front panel, your front panel is just a guide for now.

I also added my sentiment and an image to the chessboard so this is revealed when the pull tab is used.
Now add foam tape around the edges of the back of the front panel, leave the backing tape on it for now and take some double sided sticky tape layering it up twice on the small scored section in the middle where it will pull up and add your forest section, ensure the stencil side is also face down and this point so its facing same way as your front panel and stick it to the double sided tape nicely lined up.
Now you can remove the backing tape from the foam and stick this down lined up with your main card base. I highly recommend this video for visual step by steps if you need them. Watch video instructions here.
With your card in its pulled position you can now stick your images to the front, the reason I do this in the pulled position it to ensure I only stick them to this section to allow for the slider element to work smoothly and your images are not stuck to the areas that remain in place.

To finish up I took the small arrow die from the slimline pull tab dies and cut from plum pudding card stock attaching to the forest area in the gap to give the recipient something to show them where to pull.
I had so much fun with this card and couldn't resist trying to get as much as I could on one card! I hope today's post has inspired you to also create a big card with lots of images, it can be really fun to have lots of areas for different elements!

Until next time, happy crafting!
Jas
X
https://www.instagram.com/jasmincraftymakes
https://www.pinterest.co.uk/jasmincraftymakes


Comments
Post a Comment