Posts

Showing posts from 2021

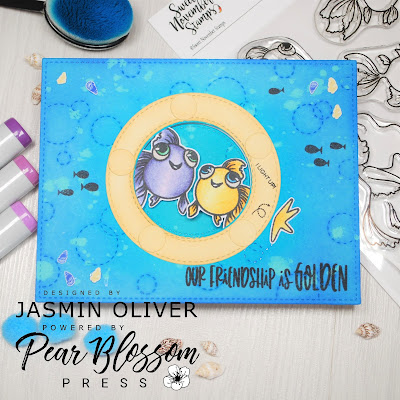
Have a mermazing day!

Image
Hey Crafty Friends, The new year is quick approaching, some of you may already be celebrating at this point! I'm here to share a quick and easy card with the new Scrappy Boy  Mermazing  stamp set. This card would work for all types of occasions, I initially had birthday in mind however this would work for a new year card too! Card Recipe: 1. Largest stitched  rectangle die cut from  ice blast card stock  2. Ink panel with broken china  into  stormy sky at the top  3. Layer on the  fireworks stencil, use an  embossing pen or pad to trace the pattern and add  totally teal embossing powder.  4. Take a breaking  wave border die and cut a shorter panel from another stitched rectangle in  ice blast card stock. 5. Ink the sea up with blueprint sketch , spritz water to reactivate ink and splatter a little blueprint sketch on top for texture. 6. Stamp desired images on  alcohol marker friendly card stock and colour in medium of your choice Copic colours: Sea Witch -  Skin: E33, E11

Shake your tail feathers!

Image
Hey Crafty Friends, This card was super fun to make, a work colleague owns a 'love bird' which meant just one thing for me. Heffy Doodle  Wingman stamp set!  The bird gives some great colour inspiration so I started with the stitched hearts  background die on  white card bringing in  squeezed lemonade ink followed by  twisted citron around the edges.  I stamped my images in black memento ink and coloured in Copic markers. Bird: R17, YR09, YR07, Y06, Y02, YG09 and YG06 Feathers: Y06, Y02, YG09 and YG06 Swing: YR09, YR07 and YR04 I finished up with  stitched strips of ease and embossed my sentiments. This was really easy to put together but I think it's come out really affective and hope our colleague will enjoy receiving it! Until next time, happy crafting! Jas X https://www.instagram.com/jasmincraftymakes https://www.pinterest.co.uk/jasmincraftymakes

Wishing you a Fintastic birthday!

Image
Hey Crafty Friends, Today I get to share my first project using the new Scrappy Boy  Mermazing stamp set. I don't know about you but I am completely Christmas'd out in my craft room now so it was really nice to change the pace with something a bit different! I decided to get ahead with some birthday cards for next year and the sentiment in this set is just perfect! I started with a piece of white card stock and used a  circle masquerade  stencil and a piece of  memo tape  to create my sunset first so I could work around this as I knew I wanted this as the main part of the background. The sun has been inked from  Carved Pumpkin  and the sky blended out into  Kitsch Flamingo  and  Picked Raspberry To create a split between the sunset and the sea I used  Horizon Lines: Oceon Beach  stamps from Sweet November Stamps. The palm trees created a nice border for me between the sky and sea. To ink blend the sea I blended  Mermaid Lagoon  from the palm tree strip and towards the bottom

I smell snow!

Image
Hey Crafty Friends, Today I'm sharing a card using the  Coffee Girls set from Scrappy Boy Stamps. If you've ever seen this show and as big of a fan as I am then this set is for you!  I've created the card with the idea of being able to send it out for Christmas. Background ink colours, wilted violet ,  broken china with  villainous potion and  blueprint sketch around the edges to create a beautiful blend into the lighter colours. Grass is  mowed lawn and rustic wilderness , leaving the tops of the grass cuts for a snowy look. Trees have all been coloured in warm grey copics W7, W5, W3 and W1. Gilmore Girls:  Skin tone: E35, E11 and E00 Clothing: V17, V15, V13, G99, YG98, YG96, C7, C5 and C3 Stars Hollow sign: C5, C3, C1, B06, B03 and B01 I've assembled the card using different depths of  foam tape to help give a little perspective.  I hope this has inspired you to grab a stamp set and make something too!  Until next time, happy crafting! Jas X https://www.instagra

Alice in Wonderland themed card

Image
Hey Crafty Friends, I'm so excited to share todays card using 2 brand new sets from Scrappy Boy Stamps, it's such an honour to be able to to work with these images and I had lots of fun with this one! You can see the full Wonderland collection including co ordinating dies  here . Alice in wonderland is a big thing where I live, being the town some of the story was written in we have lots of memorabilia around so I certainly have inspiration on hand however today's card I'm going completely whimsical and a bit of an Alice in Wonderland explosion! I started with my images stamped on  alcohol marker friendly card stock and coloured in Copics, I'm just going to take a moment to share the coloured images only and the colour combos used as I had real fun colouring these and most is likely to be covered up later!  Colour Combos: Alice: B05, B03, B00, Y24, YR24 and YR23 and YR20 Queen: R59, R37, R32, C7, C5, C3, C1, Y08, Y06 and Y04 Mad Hatter: G17, G16, G14, Y28, Y26, W5,

Quick clean and simple birthday card

Image
Hey Crafty Friends, Today I'm sharing a clean and simple yet bright and vibrant birthday card using the Crafty Purple Frog  Party Mouse stamp set. I started with a piece of bright white  card, using some low tack tape I created a masked strip on my panel. I'm using Heffy Doodle Memo Tape , not only is this low tack tape not going to tear your project when removed but has a nice width with straight lines each side to create the perfect focal strip on your cards! I've used my mini  STAY-tion to get the tape straight my using the grid lines.  I then took a range of inks in rainbow colour and blended them within the exposed area. Inks used from top to bottom Candied Apple , Carved Pumpkin , Squeezed Lemonade , Cracked Pistachio ,  Mermaid Lagoon and Wilted Violet .  Before removing my taped masks I spritzed a small amount of water in the area to react the ink for extra texture, you could also splatter extra colour into this area if you wish for more texture but I'm keepi

Simple christmas card ideas and Heffy Doodle Mood board challenge!

Image
Hey Crafty Friends, Thanks for stopping by again today, I thought I'd share a few simple Christmas card ideas, these simple designs came from a class I took at a card makers success summit back in July. The summit was all about taking action on getting a start on those festive makes! During the summit I made 2 cards from this class by Justine Hovey , I've added them at the end of this post for you to see. However today I'm sharing another twist on this layout based on the mood board challenge from Heffy Doodle. If you haven't seen the challenge please head on over to our group  here on Facebook to find all the details. This design has the potential for batch making, take a white panel of card stock, your preferred card stock for ink blending, for today's card im using Heffy Doodle  Bright White card stock. Use a  hill typed stencil if you have one or cut a slight hill from paper to create a mask from the bottom of your panel so you can blend a sky, My sky is blen

Sweet November Stamps IG hop and new release!

Image
Hey Crafty Friends The Crafty Purple Frog team were invited once again to join the Sweet November Stamp team for their new release IG hop. Its always a real pleasure to work with these ladies and their stamps. They are just irresistible! Firstly the hop details! You have today and tomorrow 14th November to follow and comment on each of the accounts in the image below for your chance to be entered. I do hope you can come and hop along with us!  Insta-Hop Now onto my card, I've used the brand new  Joyful Noise stamp set, these angels are just adorable, I've coloured them using copics, RV19, RV15, RV12 and V09, V06 and V04 for the clothing. I used Fair Skin and Gold Brown triblends for the skin. The cute critter in the middle is taken from last years stamp set  drop it like it's cold I cut my image using the 2nd to largest oval die . I inked up my background using the  rays the roof stencil from Heffy Doodle and cut some strips of scrap card from  papermill direct to set t

It's your birthday, time to sparkle!

Image
Hey Crafty Friends, Today's card is a special one made for a work colleague, I don't usually put so much effort into a colleagues card however this particular colleague loves Disney, having had this idea in mind for a while I thought I'd finally put it down on paper!  These Mine Workers from Kindred Stamps are so adorable, the image size is perfect for a slimline card to get them all on one card and create a magical scene.  This card turned into a real labour of love with lots of masking of images in the background. I built up my background randomly to be honest! Using the Treasure Trolls stamp set from Craftin Desert Divas I stamped 5 lamps across the top of my panel, 3 carts on tracks randomly across the page and stamped a variety of the gems around too.  Once stamped I coloured my images first and then using Heffy Doodle Memo Tape to mask all these images before ink blending. Once masked I inked Squeezed Lemonade around the lamps to create a glow, then starting from the

Gift of flowers in card form!

Image
Hi Crafty Friends, Thanks for stopping by again today, whilst we are currently heading in winter here in the UK I always feel a bright cheerful card might be need just to brighten someone's day, instead of buying flowers I thought I would make my own very floral card instead! Today's card features the Crafty Purple Frog  Blooming Marvelous  stamp set. Along with a large rose image there are lots of smaller rose images.  Starting with a large  Stitched Circle  die I randomly stamped the smaller images, turn the circle from time to time to get a random look in your stamping. I then coloured these using copic markers in pink, purple, yellow and orange. I then took the large rose with the 3 different sized leaves to create a focal point on the card, I coloured the large rose in yellow for friendship. Added a sentiment in from the same stamp set and I love how bright and vibrant it turned out. I will be back soon with more inspiration, until then, happy crafting! Jas X https://www.i

Snow Globe - Cute Christmas Deer card

Image
Hey Crafty Friends, Today I'm sharing a card I made adapting a hot air balloon die into a snow globe. Don't you just love it when a die in your stash can work in more than one way! This is exactly what the Heffy Doodle hot air balloon die can do for you!  To start I took the main hot air balloon piece and ink blended down a sky look with Blueprint Sketch, Mermaid Lagoon and Tumbled glass. Use a little water to splat on top of the ink to create a snowy look, I also added some Copic Opaque White ink to splatter on too. I then took the little town border dies by Heffy Doodle and cut this from a white piece of card stock to add into the globe section. Ink the bottom up with a little Tumbled Glass to help it blend in with the rest of the globe. For my images I am using the Deer to Me stamp set by Heffy Doodle. I have coloured them using Copics and add some dotting over the images using the Pear Blossom Press White Gel Pen so it gives the feel they really are in the snow! Now to make

Fortune Teller Tabby - Birthday Card

Image
Get your FREE  ticket now to this great event! There are 25+ speakers, lots of new techniques to learn and most of all a lot fun! Get your FREE ticket  here  you won't want to miss it! Hey Crafty Friends, Today I'm sharing a birthday card I made for a work colleague. Cat cards are not something I reach to make very often unless I have too and I don't own too many either, there are a few work colleagues who love their cats and I feel I have totally exhausted the stamps I do own this year until I found this Lawn Fawn Fortune Teller Tabby at the back of my stash!  I decided to go with a galaxy theme to stage my image. I've use a coordinating die from the Time for Tea  Spooktacular stamp set. Starting with the circle piece I ink blended a galaxy sky using Wilted Violet , Blueprint Sketch ,  Cracked Pistachio and  Black Soot Distress Inks. I die cut the same piece again from  huckleberry card stock and used just the scalloped edge to frame my galaxy section. For added t

Our Friendship is Golden - Halo Lights!

Image
Hey Crafty Friends it's Jasmin here from  @jasmincraftymakes   I'm excited to be back to share my 2nd post as Guest Designer for Pear Blossom Press, today's card feature's the  Halo Lights . These are super easy to use and give that something extra to your projects! For this card I wanted to use a stamp set and sentiment that would relate to us all. I think all friendships in the craft world are golden! This stamp set is from Sweet November Stamps called  Goldie , So let's get started! (Light up photo at the end of my post  🙂 ) For my background I have used the  Stitched bubble background die  by Heffy Doodle, I started by inking up some coloured card stock. Using coloured card stock gives you a primed base for inking, for additional texture I flicked water to react the inks to give a splatter affect. Once I have cut the panel from the die I took a  stitched circle die  that was the same size or near as to the  Halo Lights  and cut this centrally from my panel. Bef

Victorian Christmas

Image
Hey Crafty Friends, Welcome back! I'm super excited about today's project, have you seen the amazing stamps from  Scrappy Boy Stamps ? If you haven't yet stumbled across this amazing company please do go check them out!  When Sean asked if I would like to Guest Design obviously I couldn't say no! This Victorian Christmas stamp set is just perfect for those festive cards. It's filled with lots of decorative elements, lovely sentiments and 4 people images, you could use this set over and over again in different ways it's very versatile. I went with a rather large card for my first project! This is an 8.5x11 piece of  card stock that I scored in half to create my base. I cut a front panel to the same size and used a  stitched square die  to form 2 windows each side. With the cut outs from the windows I inked this with  Victorian Velvet  distress ink and Catherine Pooler  Royal Treatment  ink to stamp a small bauble element in a wallpaper affect. To complete my sce

Anniversary cards - including Hubby's first ever card!

Image
  Hey Crafty Friends, Today hubby and I are celebrating our 3 year wedding anniversary. Life has been busy and neither of us had the chance to pre make or buy usually in his case a card for the occasion so I set him a challenge! Hubby has never made a card before and I tell you now it wasn't easy to let him lose on my supplies! First up is the card I made, I decided to use the Heffy Doodle  Veggie Patch  stamp set with the  Coordinating dies  and coloured up my images using copic markers. I then took a  stitched square die  and die cut 2 panels, one from  bright white  card stock and one from  butterscotch  card stock. Taking the butterscotch card and  stoney maloney  stencil I used  Scattered Straw  distress ink for a tone on tone look. I then centrally die cut a heart from this panel using a  stitched heart  die and stamped my sentiment under the heart. Then taking the back panel which I had cut from white card stock I used the Heffy Doodle  Green Fields  stencil, I love this ste

Light up card with EZ lights by Pear Blossom Press

Image
  Hey Crafty Friends,  I'm so excited to be here today to share with you a project as a guest designer for Pear Blossom Press. Today's card will feature the   EZ Lights , watch this space for another project I will be sharing soon using the new Halo Lights!  I've always dreamed of taking a hot air balloon ride, maybe I'll get there one day! For now I will have to live vicariously through this adorable up, up and away stamp set by  Kraftin Kimmie . Starting with my images stamped in  Black Tuxedo Memento Ink   on  alcohol marker friendly card stock   and coloured them in copic markers.   Next up I took 2 of my favourite stencils from my stash, both Heffy Doodle,  head in the clouds  and   balloon room . Whilst these are 6x6 stencils due to the layout of them they work great with slimlines and other shaped cards as they are easy to layer up!  I've used a variety of Distress Inks to give a colourful background and die cut the panel from Heffy Doodle Slimline  mini mail