Hello cards using MFT Tea Party

Before I get onto my cards let me tell you about this amazing FREE event. The Card Maker Success summit registration is officially open! This 4 day event is jam packed with speakers. Lots of classes to learn new techniques and above all have fun! Join us now and get a kick start of your projects for the year!
I attended the summit in July last year which was all about kick starting the Christmas cards. This one is all about all the other projects you may need this year such a birthday cards or Halloween cards. Get your FREE ticket now and if your interested in last years summit watch out for the page after registration for your chance to purchase the replay of last years summit!
Now with all that said onto my cards!
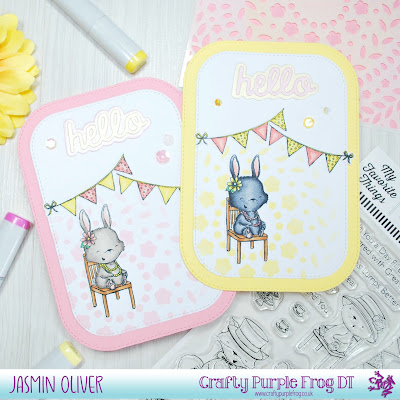
I have had this MFT stamp set Tea Party in my stash for a while so though it was about time to ink it up! I've started with a clean and simple design, I couldn't resist doing the design in 2 colour combinations. I would love to hear in the comments below which one is your favourite, pink or yellow?
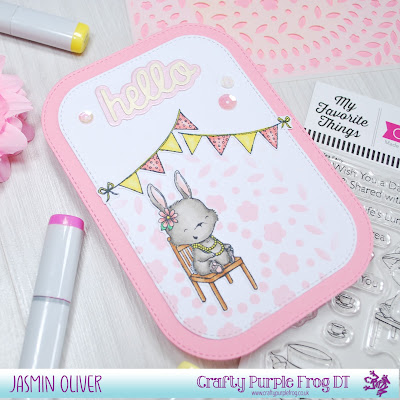
Card Recipe (Pink)
1.Stamp desired image on alcohol marker card and colour in copics. I have stamped twice so I have the image ready for my 2nd card
Colour combination:
Rabbit - C5, C3 and C1. Pearls Y06, Y04 and YO2
Buntin - Y06, Y04, Y02 with R08, R05, R02
2. Die cut a stitched rounded rectangle die (2nd largest) from bright white card stock
3. Stencil using Ring of Rosies and Spun Sugar from the corner up fading it out into the white in a circle motion
4. Die cut another stitched rectangle (largest this time) from Bubblegum Blush card
5. Layer your stenciled panel onto the pink card stock
6. Die cut Hello shadow cut from card stock, I am using mettalic type card from Papermill Direct
7. Place your Hello centrally towards top of your card and stick image of rabbit in bottom left hand corner where you stencilled and banner just above

Card Recipe (Yellow)
1. Take the 2nd stamped rabbit image and colour in copics
Colour combination:
Rabbit - C9, C7, C5 and C3
Buntin - R08, R05, R03 with Y06, Y04 and Y02
2. Take another 2nd largest die cut rectangle from white card
3. Stencil using same Ring of Rosies stencil with squeezed lemonade again from the corner fading out to white as you did with the pink
4. Die cut your largest stitched rectangle from Banana Split card stock
5. Same as you did with the pink layer your stenciled panel onto the coloured cardstock and stick your images in the same placement.
6. I have cut the Hello shadow cut from same colours as I did for the pink just in reverse
I hope you have enjoyed these cards today, the colour possibilities in this design is endless!
Thanks for reading, until next time. Happy Crafting!
Jas
X
https://www.instagram.com/jasmincraftymakes
https://www.pinterest.co.uk/jasmincraftymakes
Don't forget to grab your FREE Ticket for the online 4 day card maker event!


Comments
Post a Comment