Rock around the clock - Kraftin Kimmie
Welcome back to Day TWO of our February Krafty Peeks!
Are you excited about what you've seen so far!? Are you ready for more?
I hope your answer was yes because we've got more fabulous fun for you today!

ROCK AROUND THE CLOCK!

Check out ROCK AROUND THE CLOCK! in so many awesome creations today as you hop around the Krafty Team's blogs! You'll also see the new stencils, Add-On bundle and hybrid ink along the way!
Be sure to leave some love at each stop on the hop because there will be a giveaway of some krafty $$ to the shop!
You'll see more of our February goodies all week, and then everything will be released after our LIVE Online Release Party on Saturday afternoon at 2 pm ET in the Krafty Friends facebook group!


Card Recipe:
For some of this card I have used techniques learned through Kit and Clowder, if you haven't seen Alyce's classes yet I highly recommend them, there are some free classes as well as paid options and all come with 1-1 tutoring if you need it even the free classes! If you are interested in purchasing a class please consider mentioning you were referred by me Jasmin Oliver and we can both receive a small bonus towards another class in future, win win!
As I've gone for a full scene colouring today it's been quite simple to create. It's not a scary as it looks I promise!
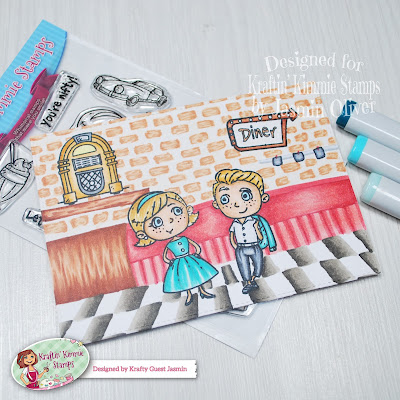
1. Think about how you want your scene to look and stamp images in desired place on card stock for your favourite medium. I'm using Copic markers so stamping images on alcohol marker friendly card stock.
I've used the 2 main people images centrally to my scene, the juke box in top left hand corner which I will sit on a kind of shelf and the diner sign in top right hand corner area. I will colour in the rest of my scene by hand.
2. Draw in your floor line with a little pencil, this should just behind your main images to create a floor and wall perspective. Then draw in faint tile lines, notice how they start thinner and slant out slightly, this helps to give the floor perspective.
Colour combination: W9, W7, W5 and W2
3. Using a pencil or if your happy to use a marker to create thin lines you can skip using a pencil and draw in a shelf under the juke box. Try and colour in the shelf in a wood effect by using the different colours to create small strokes randomly.
Colour combination:
Shelf - E18, E15 and E11
Juke Box - YR24, YR23 and YR20
4. Colour your diner sign in preferred colours. I have used the same as the wood above to keep it all tied in.
5. Now before you do the brick wall you want to draw in another line above your floor line to create a counter/sofa area. Also draw in a slight curved line a little way in from the left hand side just shorter of where your shelf sits above.
6. Colour this small section up to your curved line with in a wood effect, small thin strokes up and down to give perspective
Colour combination: E18, E15, E11
7. Now for the rest of area you have marked off you can give it a different counter look or back of diner sofa type look. I have drawn in a central line so that the top half is a more solid shaded colour where I shade from left to right and then we create a sort of pleat bottom by shading in more vertical lines, using the darker to define the pleated areas and lighter colours into the middle of each pleat section
Colour combination: R37, R35 and R32
8. We're almost there with the background! You just need to draw in your bricks. Start with one colour to fill in all the area left as the wall. I have used E41
9. Now take E21 and draw in your bricks, don't worry about perfection, we don't want it perfect! Draw in rough rectangles leaving a gap in between and then on each line under draw the bricks slightly off to the ones above to give a real brick affect.
10. Now come in with E15, you don't want to colour over the whole brick you have drawn, but small strokes randomly over the square to give them texture.
11. Come in over the whole brick with E11 to blend it all together again
I can't wait to see you give it a go, do let me know in the comments how you found the technique!
12. You can now colour you main people images, you can colour them in any colours you wish really. I have kept it quite simple
Colour combination:
Skin - E35, E33, E11 and E00
Dress and Jacket - BG18, BG15 and BG13
Trousers - C9, C7, C5 and C3
Eyes - B01
Hair - YR24, YR23 and YR20
Males top - shaded with a little C2
To finish up an extra touch you could draw in a using C3 on the right hand side of the brick wall a straight sort of line, no need to keep it thin a little thickness here is ok and then use C7, C5 and C3 to create 3 small tickets over the top, take your R37 and draw small lines in above each ticket to represent it clipped on the pole you drew.
I really hope you enjoyed today's inspiration and will give something similar a go. It can feel daunting colouring a whole scene but take it step by step and I think you might just be amazed at the results!
I'll be back tomorrow with more new release inspiration, until then, happy crafting!
Jas
X
Don't forget the FREE Card Maker Success Summit. Get your FREE ticket here now!

Consider upgrading to VIP for immediate and ongoing access to all the presentations plus bonus content! We do hope you can join us either way!


Wow, beautiful card! Love your background scene.
ReplyDeleteThank you for the detailed instructions- you recreated a perfect diner
ReplyDeleteOhhhhh I'm going to try this over the weekend! Looks like a lot of fun :)
ReplyDeleteI love the floor tiles!!!
ReplyDeleteWhat a great background!
ReplyDeleteI love the diner you created on your card. Fabulous!
ReplyDelete