Kraftin Kimmie - Skrappy Challenge
Good morning krafty friends!
SKRAPPY CHALLENGE
with Kraftin' Kimmie Stamps!
The theme of course is ANYTHING BUT A CARD!
So design a new scrapbook page, bookmark, tag, altered item, planner page, art journal, ATC cards...whatever you like!
Check out some more inspiration from the Krafty Team below and be inspired to get krafty!!
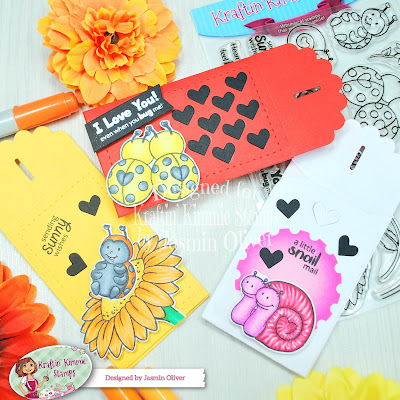
Gift tag Recipe:
1. Die cut your gift tags from 3 different coloured cardstock. I'm using Cherry on Top, Bright White and Sunny Side Up.
2. Stamp a few images from your set on alcohol marker friendly card stock. I stamped all of them initially as I wasn't too sure which ones I would use.
White and pink gift card holder:
3. Starting with my white die gift card I took the perfect postage stencil and created a focal point, I used Kitsch Flamingo with Picked Raspberry to darken the edges so we have a central highlight.
4. Colour the snails - RV19, RV14, RV13, RV11
5. Before assembling fully stamp your sentiment directly into your stenciled area using a stamping platform and Tuxedo Memento black ink
Yellow gift card holder:
6. Stamp a sentiment directly onto your gift card before you assemble
7. Colour the large flower and a lady bug
Ladybug - YR09, YR07, YR04. C7, C5, C3, C1
Flower - Y38, Y35, Y31
8. Use foam tape to attach your images to the gift card holder to add dimension
Red gift card holder:
9. Die cut small hearts from black card stock
10. Colour the double lady bug image - Y08, Y06, Y04. C7, C5, C3, C1
11. Use White embossing powder on a small banner die to emboss your sentiment.
12. Use foam tape to attach your image to the left hand side
13. Use adhesive glue to stick down your black hearts vertically, alternating them so each row has 2 then 3 to add interest!
14. Use foam tape to also attach your sentiment banner. Don't worry if it goes off edge, I've purposely placed and stamped my sentiment to one end of the banner so I can snip it off straight on the left.
I hope you have enjoyed today's inspiration, who wouldn't love to receive one of these adorable gift cards!
Until next time, happy crafting!
Jas
X
https://www.instagram.com/jasmincraftymakes
https://www.pinterest.co.uk/jasmincraftymakes
Challenge entries:
Simon Says Stamps - Wednesday Challenge - Anything Goes


Comments
Post a Comment